O - Goshi: The Judo Throw Everybody Wants To Do
O-Goshi is a throw that everybody wants to learn. The only reason I can think of as to why everybody wants to learn this throw is because it is a spectacular throw. Yet it is not that easy to master nor learn properly.
 |
| Stand Tall: Respect and Affect Click Here For More Information |
- Failing To Look in The Direction You Are Throwing
- Failing To Break The Balance Of Uke As You Enter The Throw.
This Is The Most Important - Don't Grip The Belt
- Don't Use Your Hip-Hugging Arm To Complete The Throw
- Your Hips Should Be Aligned Centre or More of Uke
- Don't Use Your Strength To Complete The Throw
See in the picture (Fig.1) how Tori is looking in the direction that he is about to throw. Failing to do this hinders movement and interferes with the momentum of the throw.
 |
| (Fig. 1) Looking in The Throwing Direction |
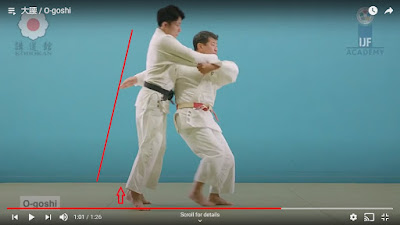
See from the picture (Fig.2) Uke is on His toes (red Arrow) and being drawn forward (red line).
 |
| (Fig. 2) Break The Balance of Uke |
Many players grip Uke's belt when they demonstrate this throw. Whilst it can be argued by the demonstrator that this does not affect the throw, the reality is that gripping the belt has the potential to change the throw to Tsuri-Goshi as it can easily change the Kuzushi of the throw. To avoid this is simple. Don't grip the belt. At most, just place your hand on it without gripping (Fig.3). You don't need to grip in order to complete the throw and if you do, you are probably not doing O-Goshi.
 | |
|
The temptation for all Judoka, particularly beginners is to use the hugging arm to push Uke over your hip to complete the throw. This is completely wrong. There is no gentler way to say it. As soon as you use your hugging arm to push you to affect the momentum and setup.
Look at it this way, your pulling arm, the one with the hand gripping the Uke's sleeve, is drawing uke around and it feels like if you push you are assisting that. But remember basic physics says, "every action has an equal and opposite reaction", so when you push on Uke with your hip-hugging arm against uke's hip which is firmly planted on your hips the opposing force to the push takes away from the movement of your pulling arm and the rotation of your body. In simple terms, it is very hard to pull and twist when you are also pushing with your other arm.
More than any of that, your hugging arm should be so far behind your back and your hip so far through to the other side of Uke, pushing with your hugging arm should be next to impossible.
The whole point of the hugging arm is to just HUG. It is intended to hold Uke in so tight that they cannot avoid being drawn onto Tori's hip and held there tight until it is no longer possible to hold as the throw is almost completed. You can't do that and push with your hugging arm as well. The tighter the hug the more efficient, not to mention spectacular, the throw.
Instead of pushing, you should hug harder and allow your hugging arm to move with the rest of your body when it rotates.
This may seem a little counter-intuitive but if you practice it then it works.
The placement of your hip will make all the difference in this throw. Your hip should be either centred on Uke hips (Fig.4) and below Uke's belt (Fig.5) or past Uke's hips (Fig.5A) and below Uke's belt.
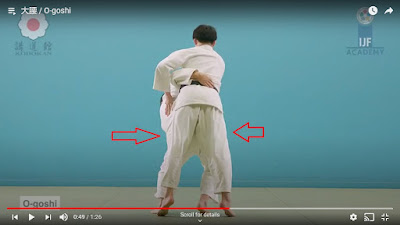 |
| (Fig.4) Align Your Hips |
 |
| (Fig.5) Place Your Hip Below Uke's Belt |
Moving your hips past Uke's hips (Fig.5A) is not my favourite position. Not because it is incorrect nor that it is inefficient. No, I don't like it because I got thrown by this version when I was in Hong Kong. Because I was unfamiliar with the way it was done I became disorientated and landed on my collar bone. I had to have it operated on when I got back to Australia. Never-the-less, despite my woes, this position, though much more strenuous than the aligned hips above, is very effective and if you can do it, may yield a powerful throw.
As an aside, I know that this version is much more strenuous because I did practice it when I recovered from my shoulder injury and found it to be as I have described.
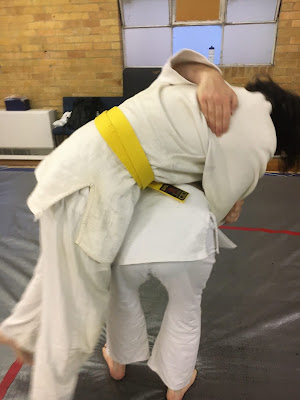 |
| O Goshi Hip Positioning All The Way (Fig.5A) |
O-Goshi is a leverage throw it is dependant on your ability to support and balance (not lift, see more on "Not Lifting" below & Fig.8) Uke with your legs as you draw them over your body. Your hip should be the fulcrum, placed just below Uke's hips and aligned as outlined above. Your hip-hugging hand secures Uke's hip firmly (as much like a vice as you can) in place (Fig.5 above) and your sleeve holding hand pulls around in front of your body (Fig.6 & 7) providing the forward momentum as your whole body rotates (see more on the "Whole Body Rotation" below).
Other than the strength in your legs required to momentary support Uke as you throw them. None of the rest of this requires strength. If you have to use strength, you're doing something wrong.
 |
| (Fig.6) Hand Pulls Around in Front of Your Body |
 |
| (Fig.7) Hand Pulls Around in Front of Your Body 2 |
Whole Body Rotation
This rotation is best observed in the video (the bottom-most one) starting at 19 seconds through 21 seconds with the most action taking place at 20 seconds.
Not Lifting
You will note in the video that there is no lifting of Uke at the end of the throw. Lifting Uke is often seen in the demonstration of this throw. Despite commonly held belief, lifting is incidental and definitely not required for execution. It can be hard to convince some that this is the case but I promise you, if you practice O-Goshi without lifting Uke at the end, your throw will improve.
Explaining the Difference Between Uke-Goshi and O-Goshi
The biggest problem in teaching O-Goshi is convincing every student that O Goshi is NOT Uki Goshi and getting to learn the differences. So here is what I use to explain to new students the differences between the two throws:If you are doing O-Goshi correctly you should be able to balance Uke on your hips before throwing. Uke Goshi is a hip glance, it comes off the side of your hips, you cannot balance Uke on your hips.
Though stopping to make sure Uke is balancing on your hips before throwing makes the throw hard to complete, it does demonstrate that O-Goshi does require Tori to be strong enough to support Uke, even if only for a moment, in order to do this throw properly. So even though it makes the throw hard to complete it is a good thing to practice when you are learning to do this throw properly.
45 deg or on hip
There is one more thing that I should mention and that is the angle at which Tori places their hugging arm.
When I was first taught both Uki Goshi and O Goshi, I was taught to position my hugging arm at about 45 deg up Uke's back towards the shoulder (Fig.9 & 10). This works great but as you can see from the video not everybody does it.
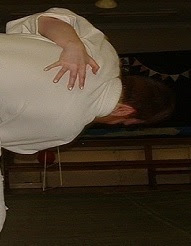 |
| (Fig.9) Close Up of O-Goshi Hugging Hand At 45 Deg |
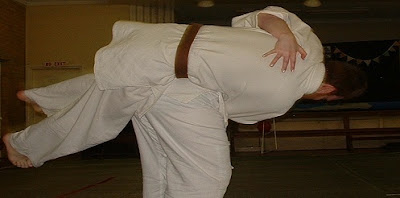 |
| (Fig.10) O-Goshi with hugging hand 45 deg. up Uke's back. |
I have no idea which is better. Certainly, it helps some players to learn and in competition whatever grip you can get is going to be best as long as it helps complete the throw. So practically it is neither here nor there if you do it or not. But if it helps you to learn O Goshi by doing this you should do it.
 Random thought on Life, Judo Olympics, Judo Self Defense, The Art or Judo Kata, Judo An International Sport. Things that inspire or annoy me or things that I just had to write down.

No comments:
Post a Comment